Day three… for those of you who are just tuning in, this week’s focus is on Essential Knowledge. While this is geared towards newer users, it’s also intended to help more experienced users round out their understanding of the basics.
I know this is a topic that’s been covered a fair amount, but I seem to be on some maniacal personal quest to continually improve my explanation. Yes, maybe I need a hobby. Or a therapist.
(P.S. – Apologies for the site looking a bit clunky. We’re
tightening some bolts over here, and will have things spiffed up in the
very near future…)
OK, lets break down Back To Arrangement a bit.
As you may already know quite well, one of the weird and wonderful breakthroughs that Ableton brought to computer sequencing is the easy ability to switch between the loop-oriented Session view and the timeline-based Arrange view for two different perspectives on making music. The tricky part is that for any one channel in Live’s mixer, there are two different ways of playing clips through it – either from Session or from Arrangement.
The glue that holds this world together is the Back to Arrangement button (below, in red).
![]()
This is not a traditional button in that the user can only turn it OFF. Live turns it on automatically under certain conditions, so you need to learn to pay attention to it the way you do with other types of automatic indicators in your studio (level meters for example).
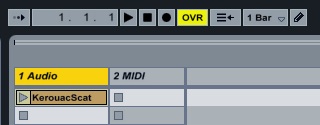
There are two conditions that cause Back to Arrangement to light up. Today we’re going to focus on one of them. To do so, I’m going to suggest an experiment: Start with a new, completely empty Live Set, and drag a single audio file or Live Clip into the Session View. Right now, your set should look something like this:
OK, now launch the clip and take a look at Back to Arrangement. Aha.
Now, click on Back to Arrangement…the currently playing Session view clip will stop playing back immediately.
So here’s rule one, part one: any time a clip is playing back in the Session View, the Back to Arrangment button will light up. Clicking on it will immediately cause Live to switch over to playing back whatever is in the Arrangement view – even if it’s nothing at all.
For the next step in the experiment, use Global Record to record your clip into the Arrangement View.
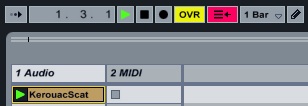
Once you’ve got several bars recorded, hit the spacebar once to stop recording and again to begin playback. You’ll hear the clip play back from the Arrangement. Now, in the Session View, click on the Stop button in any empty clip slot:
![]()
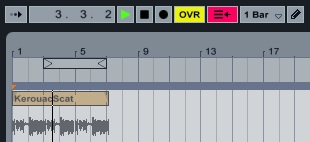
Without stopping Live, switch over to the Arrangement view and notice two things:
1) Back to Arrangement is lit up again, and…
2) The clip in the Arrangement view has been grayed out
So here’s rule one, part two: clicking a Stop button in the Session View causes all Arrangement clips to be disabled for that track – until you click Back to Arrangement.
Hopefully in this context it’s pretty easy to see what’s going on. Where things can get confusing is when our sets grow much more complex, and when automation enters into the picture. We’ll be talking about this tomorrow.


