A couple of years back, I stopped mixing in Live. This started as a workaround for performance problems I was encountering, but turned out to have a great creative benefit as well. People are sometimes surprised to hear that my studio life isn’t entirely Live-centric. Well, for a number of years it was. When Live 7 came out, I dumped every other program I was using. Live did everything I needed and sounded good. The simplicity and speed of doing everything in one environment trumped every other concern.
Nevertheless, it wasn’t all unicorns and rainbows. It never is. Every DAW has technical limitations and workflow issues. What I’ve discovered over time, however, is that these limitations can be mastered through changes to workflow and mindset, and that these changes can lead to greater productivity and better sounding music.
What follows are some issues it’s important to understand when mixing in Live, followed by a more general point about the benefits of separating the production and mixing process.
THE PERFORMANCE THING
If your songs have relatively low track counts (less than 40) and you have a powerful computer with plenty of RAM, you may find that mixing in Live is a breeze. The more complex your Sets get, however, the more you may encounter glitches that don’t go away even when you pursue common remedies such as freezing tracks and increasing the audio buffer size. I have tried and failed many times to figure out a reproducible formula for demonstrating Live’s performance issues with large, complex sets. The only conclusion I’ve been able to draw is that Live just isn’t optimized for high track counts.
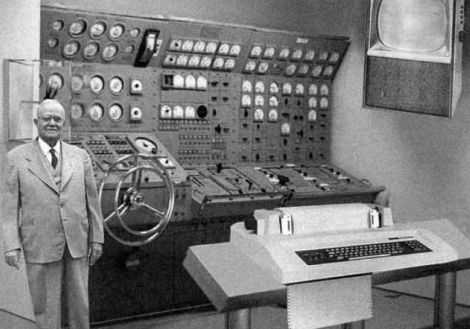
My studio computer, and trusted studio assistant, Sigmund.
Aside from all of the commonly known procedures for conserving CPU power, there’s one essential trick for getting better performance out of Ableton Live when it’s being crushed by a complex mix: delete everything from the Session View. Don’t just delete the clips, delete the scenes as well. You should only have one empty scene in the Session View. I don’t have an official explanation for why this works as well as it does, but I assume it has something to do with the real-time nature of the Session View (and of Live in general). In other words, while playing back your processor-paralyzing arrangement, Live is also keeping everything in the Session buffered and ready to go, wasting precious resources.
BUFFER MADNESS
One peculiarity of Live is that, when used with certain audio interfaces, it performs poorly with a large audio buffer. My experience is that Apogee interfaces are the worst culprits for this issue, but I believe it comes up with some other manufacturers as well. It’s my personal theory that the lowest latency drivers are the most prone to this issue, but I can’t say for sure. Core Audio native interfaces (ones that do not require a driver) are not prone to the large buffer issues I’m going to explain.
Typically, increasing the audio buffer lowers CPU usage and makes it easier to work with complex material. It’s a common practice (with any DAW) to run a low buffer size when composing, for the lowest latency, and then increase the buffer size as needed when it comes time to mix. However, with certain interfaces there is a point at which increasing the buffer size makes performance worse. In other words, you might find during a mix that you’re getting a few glitches here and there with your buffer set to 512. When you increase the bufer to 1024, the glitches go completely crazy.
If you’re not sure whether you’re a victim of Buffer Madness, you’ll have to do some troubleshooting. One easy way to do this is to use your computer’s built-in audio. To do this, first close the Set that’s giving you problems, then switch over to the built-in audio (in the Audio tab of Live’s Preferences). Don’t switch audio devices while you have a complex Set open; that can cause additional problems. Set the built-in audio buffer to 1024 or 2048. If this resolves the issue, you may want to look into a new interface.

Typical victim of Buffer Madness.
THE AUTOMATION THING
Automation in Live is not delay compensated. This is important to understand.
All plug-ins generate latency. Some just a couple of milliseconds, others quite a lot more. That means that the audio comes out of the device later than it goes in. This should come as no surprise, since as corporeal beings we are stuck in this thing called “time.” Things happen in sequence, not all at once. When mixing audio using a console and hardware processors, the same holds true: it takes time for the sound to pass through the mixer, through the effects, and then out into the speakers. In that context however, it’s not an issue because it takes very little time. Electricity moves at the speed of light, which is turns out is pretty darn quick. The delay generated by a computer software is considerably greater.

Early delay compensation technology.
This is why modern DAWs have a feature called delay compensation. The plug-in tells the sequencer how much delay it generates, and the sequencer compensates by that amount. Live has this feature, and it works just dandy when it comes to the timing of the audio. When it comes to the timing of the automation, it’s a different story.
This can be a bit of a mind-bender, so let’s use a practical example. Let’s say you’re running a bass track through a plug-in that generates 50ms of latency. When you press play, Live plays this track 50ms early to compensate for the delay that the plug-in generates. However, the automation does not get moved. Therefore, all of the automation in the track happens 50ms late. If you’re doing some slow filter modulation over 32 bars, this probably won’t bug you. However, if you’re trying to do something really precise, it may drive you nuts.
Now, to be fair, 50ms is a lot of latency for a plug-in to generate. Many generate far less. Therefore, whether this issue is a big deal for you depends entirely on your setup. I rely heavily on the UAD platform for mixing. These plug-ins are super high latency, because they run on a dedicated hardware accelerator. The audio must be sent to my UAD Satellite and back again for each plug-in. This takes time.
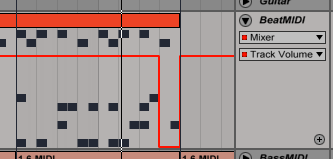
Below is a simple example to demonstrate what this issue looks like in practice. This volume automation should mute beat four of the drum loop:
…but I’ve got three high latency UAD plug-ins on this track, so it doesn’t. Instead of the fourth beat being perfectly muted, there’s a snippet of the hi hat on beat four, and a nasty click that comes from it being suddenly silenced. To correct this, I have to move the automation like this:
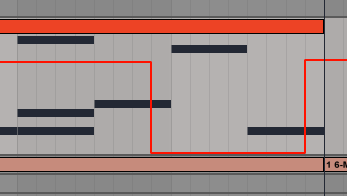
The automation sounds as if it’s late, because the audio is actually being played early to compensate for the plug-in delay. Therefore, I have to manually compensate the automation by moving it earlier. Dig?
THE WORKFLOW THING
For complex productions, there’s a huge advantage to separating the production and mixing process. There’s also a huge potential hassle. Only you can decide what works best for you.
During the composition and production phase of making music, it’s good to cut loose. Record, edit, jam, and go crazy with effects. Automate like there’s no tomorrow. Make a mess. Clean it up. Make another mess. Edit it down. Repeat.
Even if you observe good practices, such as naming and color coding your tracks, production sessions can still end up looking like the work of mental patients. They can also be very hard on your computer, what with the softsynths and wild effect chains you’re using to generate crystalline sonic landscapes that transport the listener to Valhalla and stuff.

Valhalla.
At this point in the process, some folks just push through to the final mix, freezing and flattening tracks as necessary. I’ve done this myself many times, but don’t any more. I find that converting everything to audio and starting over in “mixdown mode” has two benefits. First, it gives me all of my processor power back. Instead of fighting my system to get enough juice to get the mix done, I’ve got power to spare. Second, by signaling to myself that the production process is “done,” I can focus on sweetening what’s there, rather than second guessing whether I’ve selected the right closed hi-hat sample.
This doesn’t mean that I stop experimenting and shaping my sounds. In fact, in the mixing phase, I sometimes have to be very inventive because I’m limited to working with effects and audio editing.
Now, some of you would say that you need access to every parameter of every synth and need to be able to tweak every last bit of automation until the last second of mixing. And maybe you do. If you’re regularly completing good sounding tracks using that method, then what I’m suggesting here may just be a big pain in the ass. Otherwise, you may need some tough love: your sounds are fine. Commit to the work you’ve done, and do a final mix. Get on with your life.

Why do I see 15 instances of Massive in your final mix, maggot??
MAKING YOUR MOVE
When embarking on this process, there can be some stressful decisions at the outset. Should I turn off the EQs and EQ in the mix? How about sidechain compression? What about Group tracks–if you’ve done processing on them, should you use the group in the final mix, or use the individual tracks and recreate the group processing during mixdown?
The trick is this: don’t sweat it. Use Live’s “All Tracks” option in the Export Audio/Video dialog and get started. Make sure to use some sort of naming convention for your groups so you can easily tell them from the individual tracks. I use all capital letters, so when I see a track called BASS for example, I know it’s my bass group.
When setting up your mix, you’ll mostly use individual tracks, but use a group anywhere you think it’s appropriate. Once you’ve gotten started with the mix, it’s easy to figure out anything that needs to be exported a different way. Maybe a delay you used isn’t working. Maybe you EQed a track too aggressively, or laid on a particular effect too thick. No problem: just make a note of any issues you encounter, then take a break and re-open Live to export new versions of the tracks. It won’t take long, I promise.
IF IT’S BROKE, DON’T FIX IT
You may have noticed that I haven’t said a word about the DAW that I’m using to create the final mixes. Hold your horses–that’s for the next article, in which I’ll be discussing the pros and cons of working in the various programs I’ve been using. But it doesn’t matter anyway. This process works without a second DAW; you can simply import the audio back into Live.
Every now and then, it’s good to take a deep breath and remember that a lot of great records were made with 24 tracks or less, and a load of other limitations we never have to think about. This meant that real decisions needed to be made frequently. Recording a new take could mean erasing the last one. Effects sometimes had to be recorded to a new audio track, so the effects processor could be used for something else.
Remember what I said earlier about how the technical problems discussed in this article could be dealt with by changing your workflow and mindset? The limitations of your computer and your DAW are not flaws: they’re features. Instead of fighting with them, accept them. One of my methods is to print a bunch of stems and switch into mixdown mode. This requires a fraction of the intestinal fortitude that it takes to record and mix a record on tape. There are other methods. What are yours?


[…] case you missed the article previously, we’d like to recommend reading this fantastic article by Dubspot instructor and Ableton guru Jon Margulies, who lays down the gauntlet of knowledge for […]